

*.atlassian.net) or Confluence Data Center (installed on your
own servers). It is written for three people, who can be the same person:
- the Confluence administrator, who creates the account or token Prisme.ai reads with;
- the Prisme.ai administrator of your organization, who installs and publishes the connector;
- the users who create knowledge bases from Confluence.
1. Choose your mode
Everything depends on one question: whose Confluence rights decide what a reader sees?
Then pick the matching Method in the connector:
On Data Center, the personal mode cannot refresh a base on schedule: a Personal Access
Token can only be used by the person who stored it, and a scheduled run has no person
behind it. The owner of the base clicks Sync Now to update it. If you need both
individual rights and automatic updates on Data Center, there is no mode for it yet.
2. Prerequisites
Confluence Cloud
- A Confluence Cloud site,
https://your-domain.atlassian.net. - Shared account: an Atlassian account with read access to the spaces to sync — and only to those, since everything it reads becomes readable by the agent’s users — plus an API token for that account.
- Personal account, platform client: nothing on your side; ask your Prisme.ai contact whether the platform OAuth client is enabled on your instance.
- Personal account, your own app: an OAuth 2.0 (3LO) app in the Atlassian Developer Console with the Confluence API and its granular scopes. See Confluence app prerequisites.
Confluence Data Center
- Confluence Data Center with Personal Access Tokens enabled (validated on 9.2).
- Reachable from the Internet by Prisme.ai. Prisme.ai calls your Confluence directly; an instance reachable only from your internal network will not work. The usual answers are an HTTPS exposure filtered on Prisme.ai’s outbound IP addresses, a reverse proxy or a dedicated gateway. Ask your Prisme.ai contact for the addresses to allow.
- A domain name, not an IP address: private IP addresses are refused. For example
https://confluence.example.com, orhttps://intranet.example.com/confluencewith a context path. - Shared account: a Confluence service account with read access to the spaces to sync, and to them only.
Prisme.ai
- Being an owner or administrator of your organization for step 5.4 (publishing).
- Building rights to create a workspace in Builder.
3. Create a Personal Access Token (Data Center only)
Done by the service account (shared mode) or by each user (personal mode).1
Open your profile settings
Log in to Confluence with the account concerned, click your avatar at the top right,
then Settings.
2
Create the token
Open Personal Access Tokens → Create token. Give it an explicit name
(Prisme.ai) and an expiry date that fits your security policy.
3
Copy it now
Confluence shows the token once. Keep it like a password; never send it by e-mail or chat.
4. Install the connector (Prisme.ai administrator)
1
Create a dedicated workspace
Open Builder and create a workspace for the connector, for example Confluence connector.
Its credentials and its members are what the connector answers for, so keep it dedicated.
2
Install the ConfluenceNext app
In the workspace, open Imports, click +, search for ConfluenceNext and install it.
3
Open its configuration
Click the new instance under Imports. The configuration screen has two tabs,
Authentication and Agents.
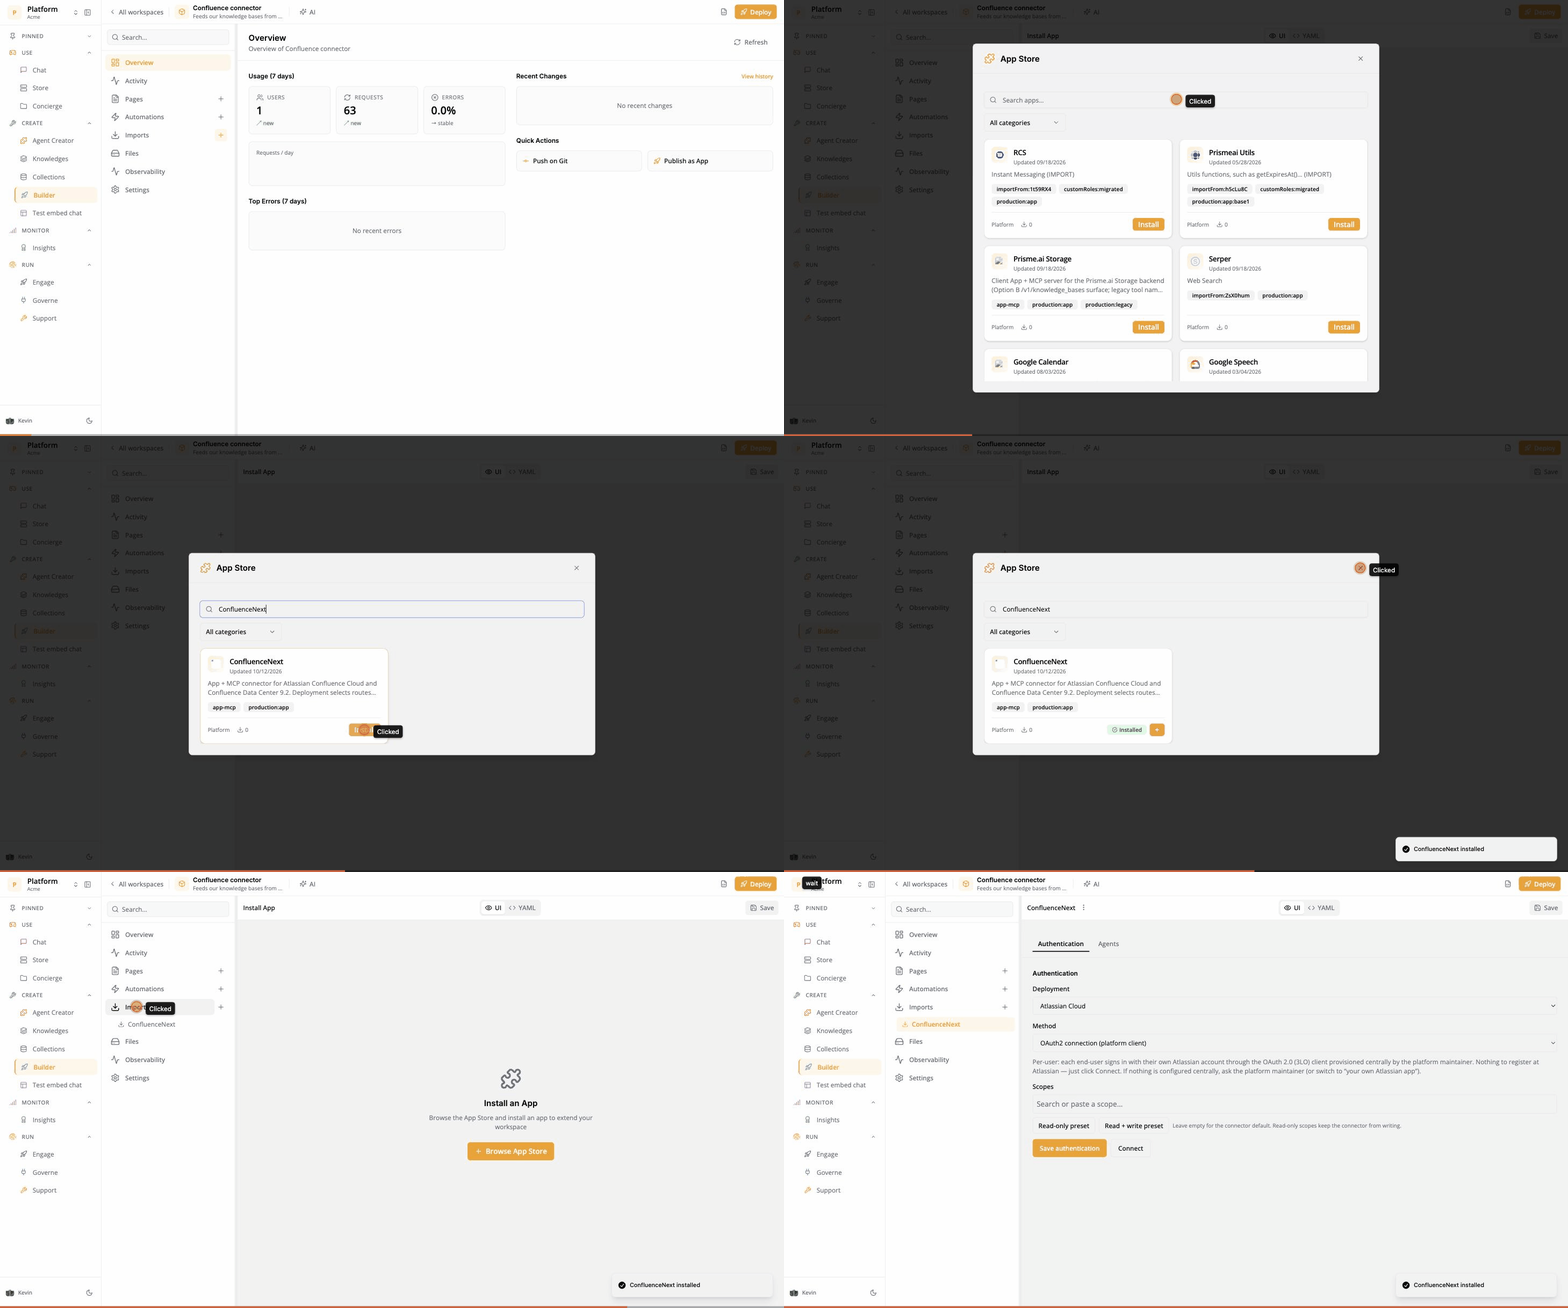
Installing ConfluenceNext in the connector's workspace
5. Configure the connector (Prisme.ai administrator)
5.1 Authentication
In the Authentication tab, choose the Deployment, then the Method from step 1, and fill in its fields.- Data Center — personal account
- Cloud — personal account
https://, includes the context path if your
Confluence has one, and contains no credentials, no ?… and no #….
5.2 Authorized agents (optional)
In the Agents tab, Authorized agents lists the agents allowed to use Confluence as a tool (search, read a page on demand). Tick them, or Allow all agents. This is not needed to feed a knowledge base: an agent that answers from the base never calls Confluence itself.5.3 Give users access to the workspace
Share the connector’s workspace, read access is enough, with the users who will create Confluence knowledge bases. Browsing Confluence from Knowledges goes through this workspace, and is refused to anyone who has no role on it. In a personal mode, share it also with the users who query the agents, since their own rights are checked through it.5.4 Publish the connector to your organization
Still in the Agents tab, under Capabilities catalog, click Add to catalog. The connector becomes available to your whole organization, in Knowledges → Connectors and in the capability catalog of Agent Creator. The button is only shown to organization owners and administrators. After a change of method, click Update catalog entry so the catalog follows: the personal modes add the Connect step that users go through in step 6.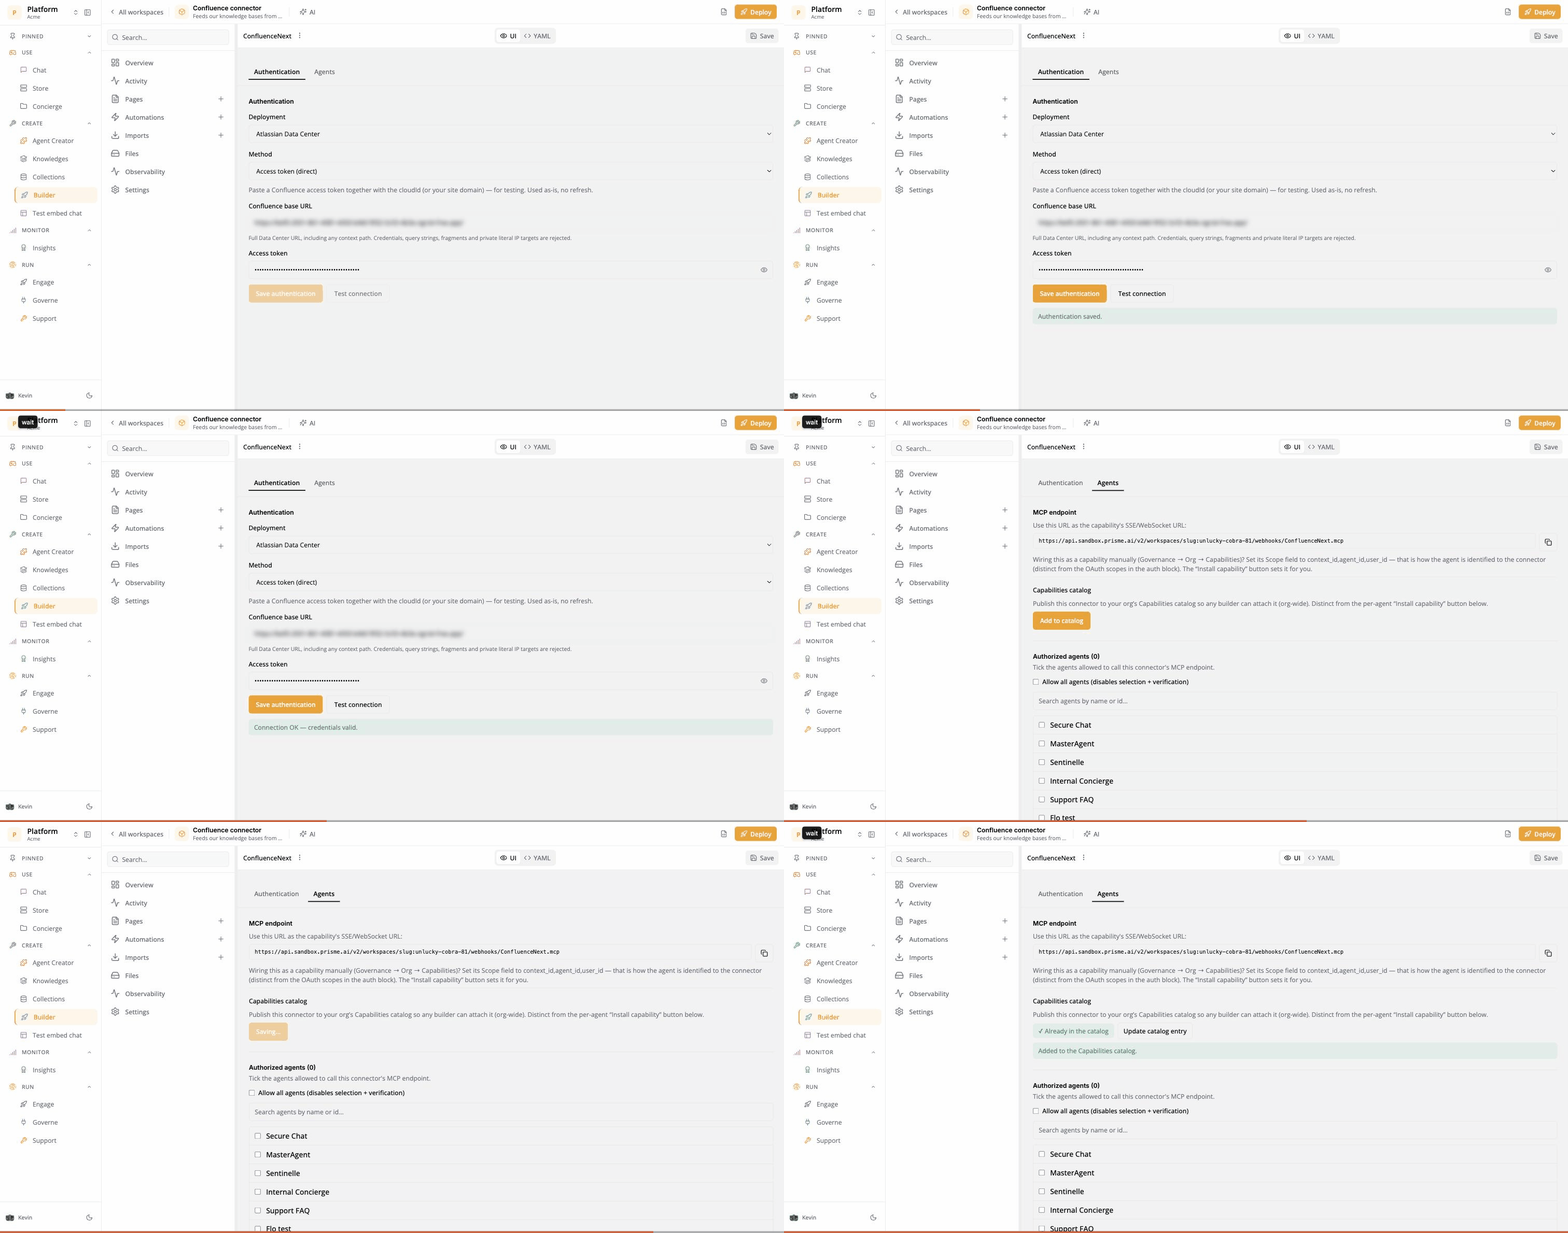
Data Center, shared account: save, test, then publish to the organization
6. Create the knowledge base (users)
1
Pick the connector
Open Knowledges → Connectors. Under Available Providers, click Connect on
the Confluence connector, then name the connection.
2
Authenticate (personal modes only)
- Cloud: sign in with your Atlassian account and grant access in the window that opens.
- Data Center: the Connect Confluence Data Center window opens. Paste your Personal Access Token from step 3 and click Connect. Confluence checks the token before it is stored; if it is refused, a token you stored earlier is kept.
3
Choose the space
Your spaces are listed by name. Tick the one to sync, then Use this location. For
several spaces, create one connection per space.
4
Set access control
Check each reader’s own permissions is on by default.
- Shared account: turn it off. A shared account cannot tell what each reader may open, and readers have no account of their own to connect.
- Personal account: leave it on. It is what guarantees each reader only sees pages they can open in Confluence.
5
Choose the knowledge base
Pick an existing base or Create a new knowledge base, then Save & Connect.
The first synchronization starts right away.
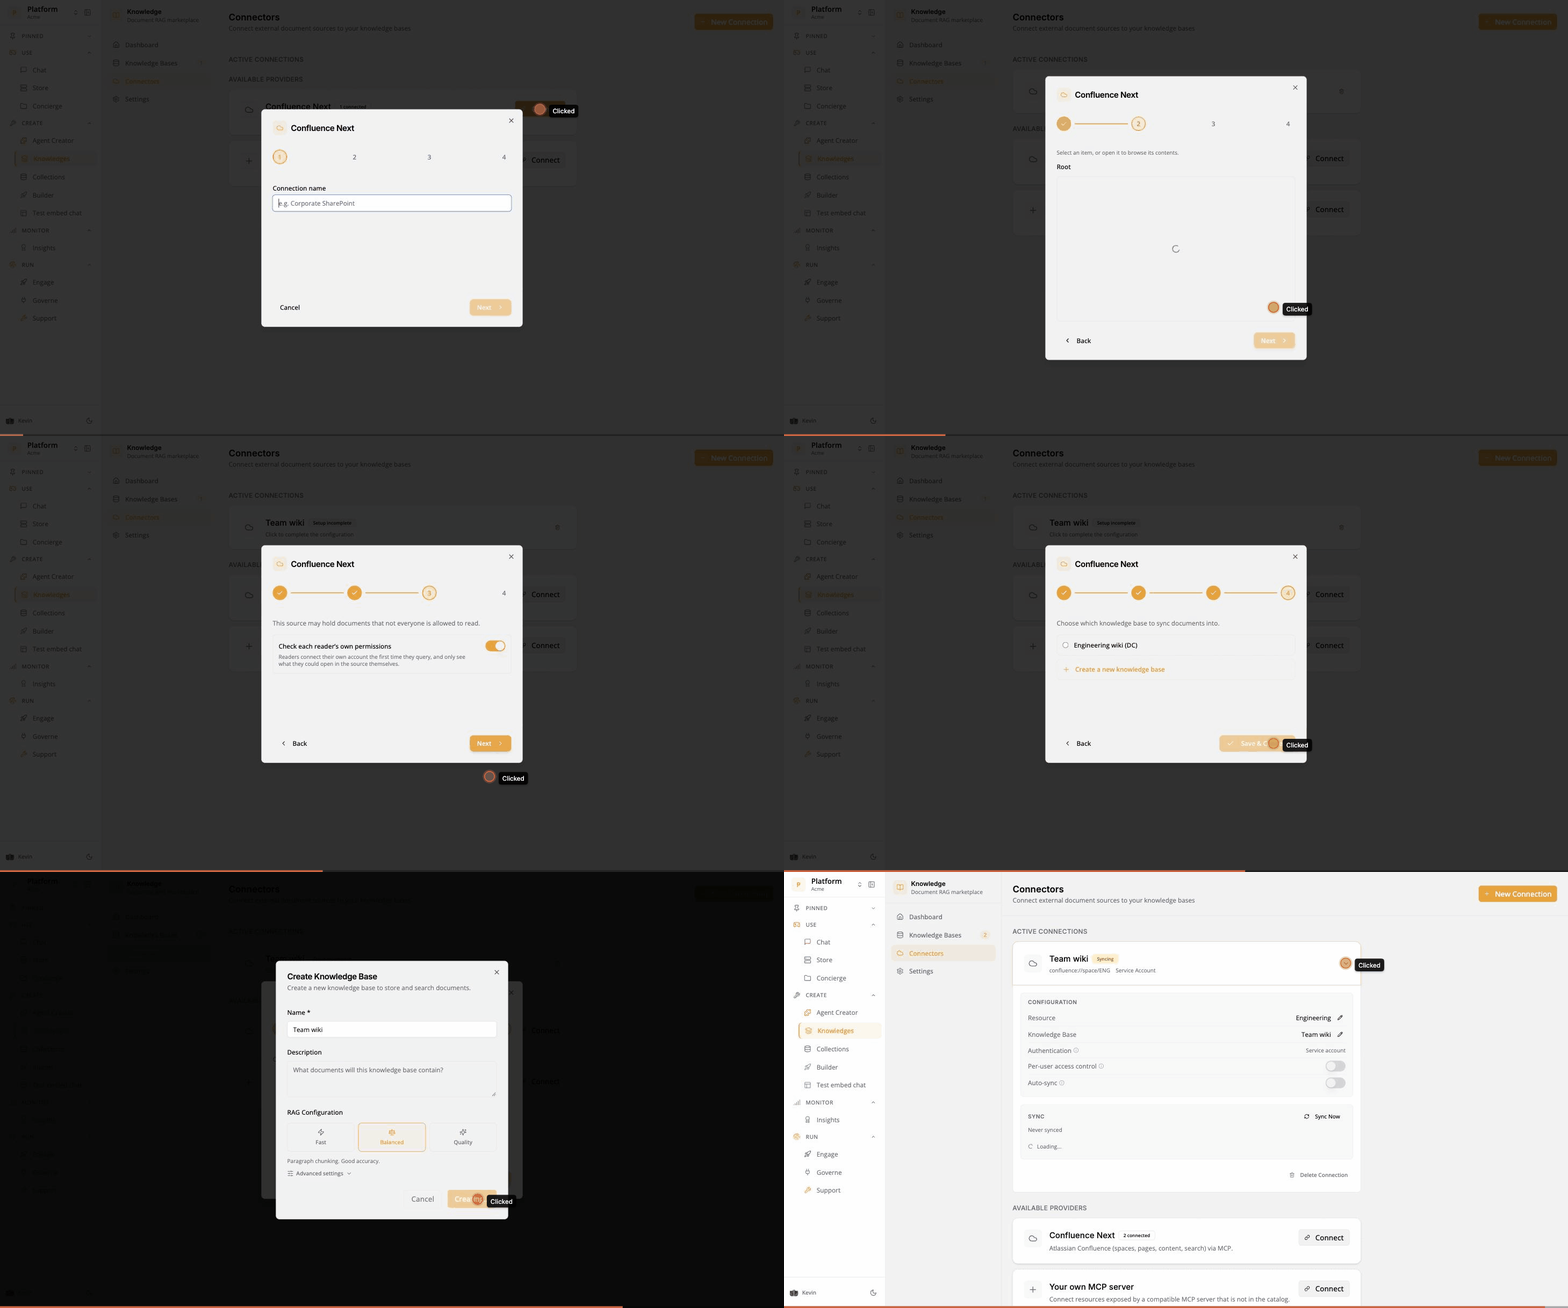
Shared account: from the connector to the first synchronization
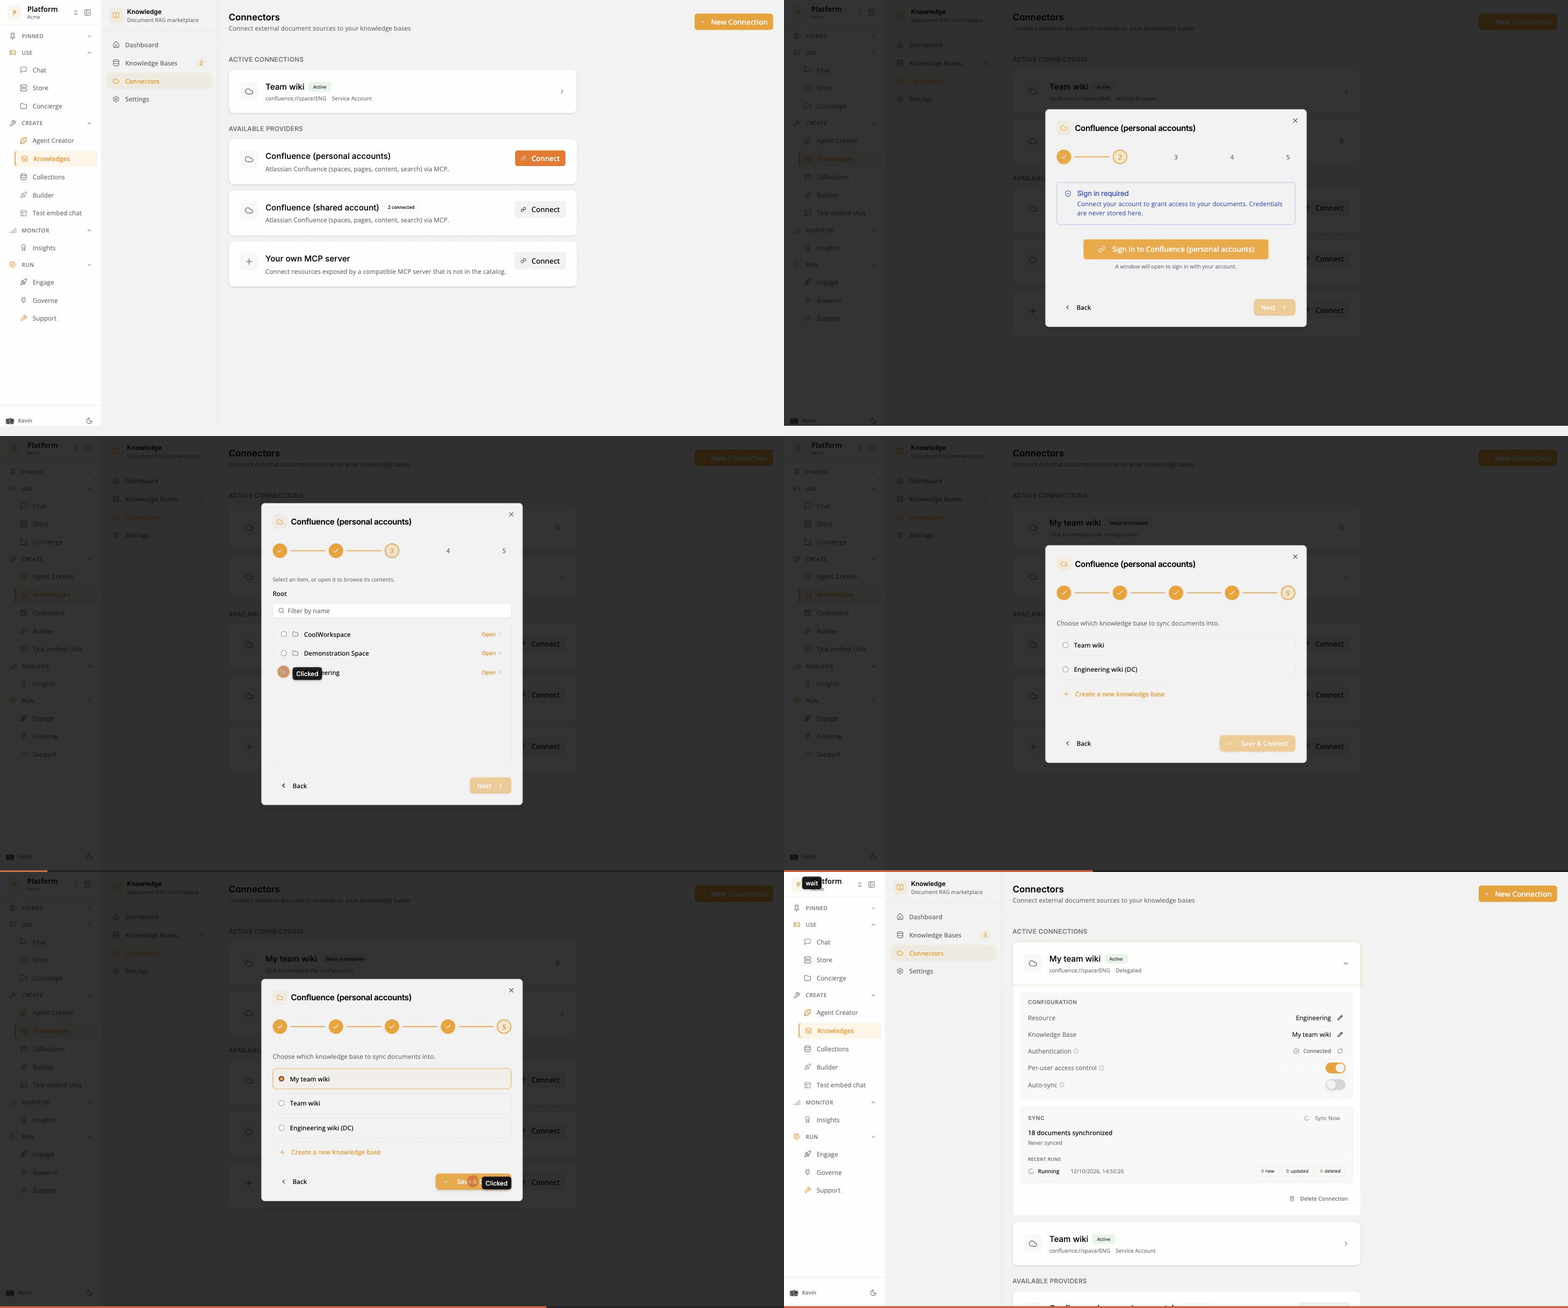
Personal account: sign in with your own Personal Access Token, keep per-reader permissions on
Keep it up to date
Click the connection in Knowledges → Connectors to open its configuration.- Shared account, and Cloud personal account: turn on Auto-sync and pick a frequency.
- Data Center personal account: leave Auto-sync off and click Sync Now whenever you want the base refreshed; scheduled runs would fail.
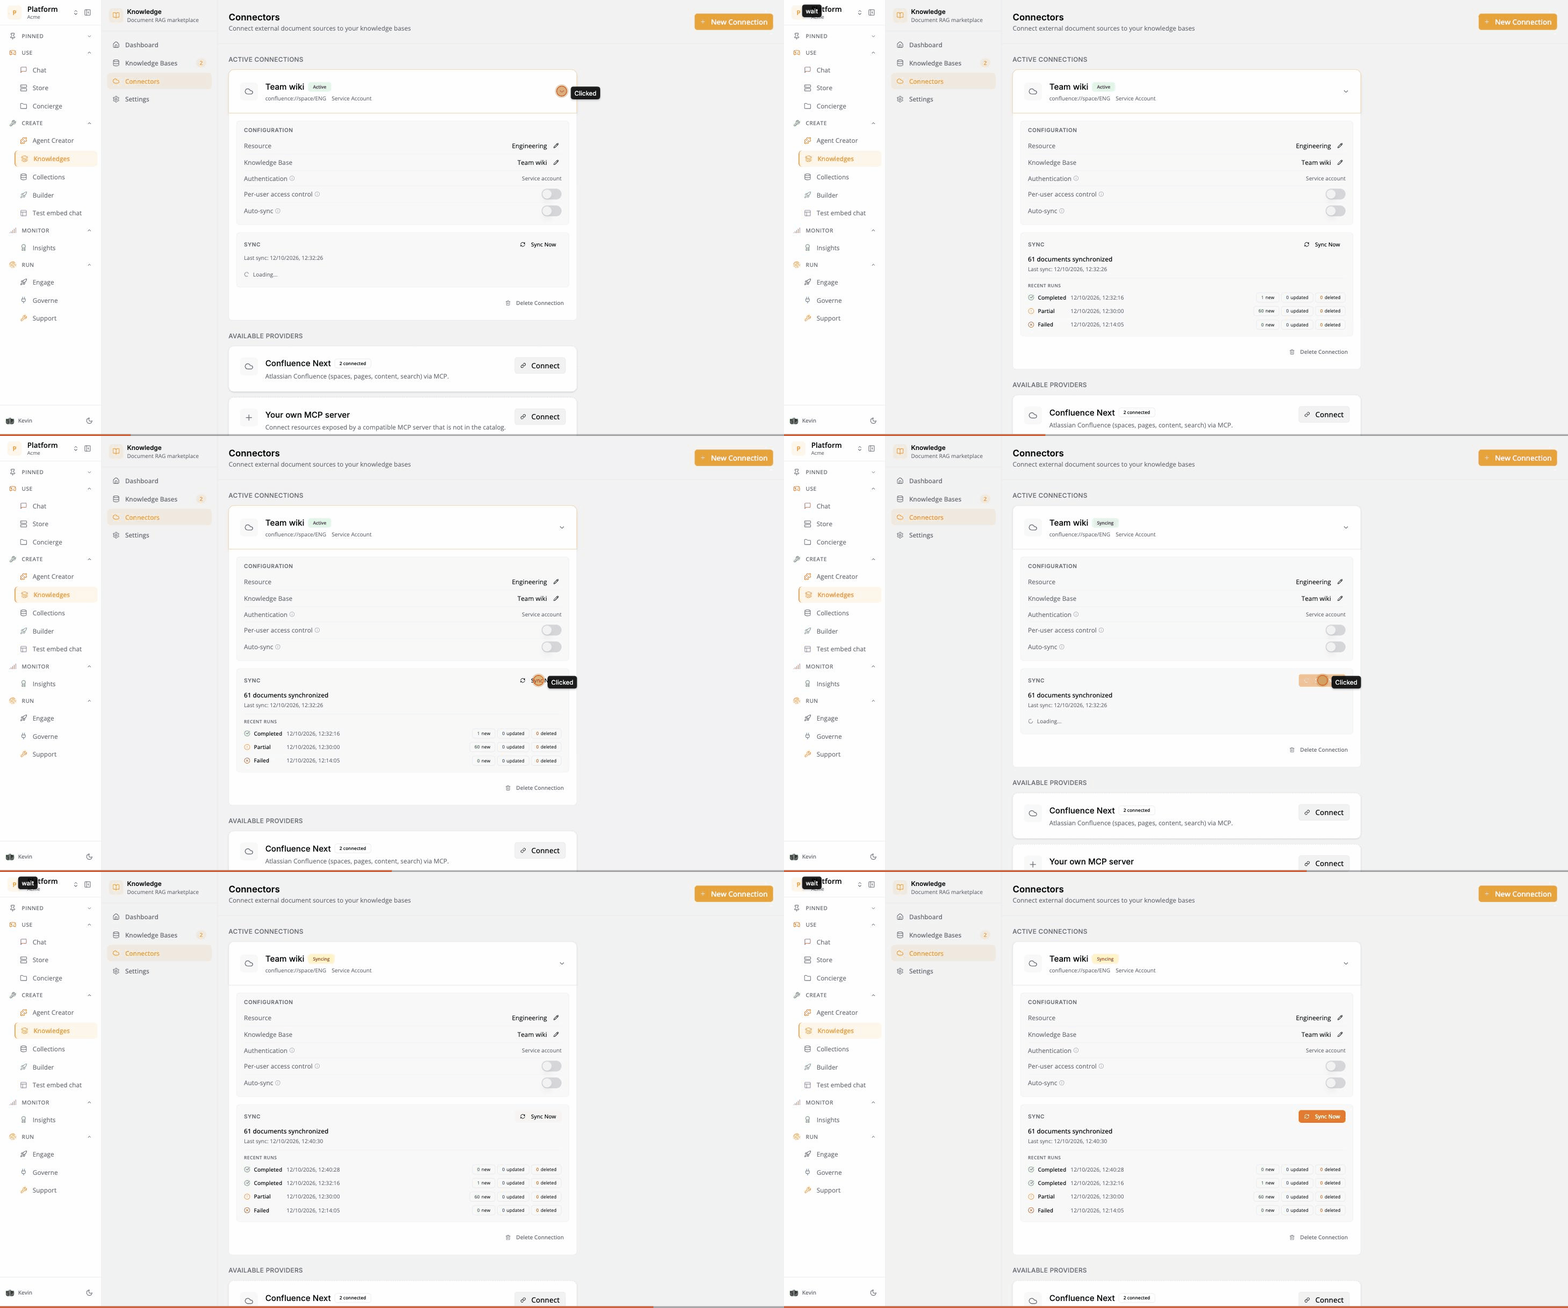
A synchronized connection: a second Sync Now only re-processes what changed
7. Check that it works
8. Troubleshooting
9. Security
- Tokens are stored encrypted and never displayed again.
- In personal mode, a user’s token can be used only by that user, not by administrators or other users.
- In shared mode, everything the shared account can read becomes readable by the agent’s users. Restrict its rights to the spaces you sync.
- To revoke access, delete the token in Confluence (or the API token at Atlassian) and, in personal mode, click Disconnect in Prisme.ai.
- Mind token expiry dates: when a token expires, the sync (shared mode) or the user’s access (personal mode) stops until a new one is entered.
10. Known limits
- Personal spaces are not supported; team spaces are.
- Only pages are indexed, as text. Attachments and comments are not.
- Data Center personal mode: no scheduled sync.
- No OAuth2 sign-in to Confluence Data Center yet. It is the mode that would combine individual rights and scheduled sync.