> ## Documentation Index
> Fetch the complete documentation index at: https://docs.prisme.ai/llms.txt
> Use this file to discover all available pages before exploring further.
# Website to RAG Agent
> Create a website chatbot using Knowledges for ingestion and Agent Creator for the agent and embed widget.
This tutorial guides you through creating an intelligent chatbot for your website using Retrieval-Augmented Generation (RAG). You'll set up a Knowledge Base in **Knowledges** that crawls and embeds your website, build an agent in **Agent Creator** wired to that Knowledge Base, and expose a customizable embed widget so visitors can chat with your content directly from your site.
## What You'll Build
* A **Knowledge Base** in Knowledges that crawls your website and stores the content as vector embeddings
* An **agent** in Agent Creator that answers questions using the Knowledge Base as its source of truth
* A **public chat URL** and an **embed widget** generated from the agent's Share Agent dialog, ready to drop into any website
This solution turns static website content into an interactive knowledge base, giving visitors a conversational way to find information instantly.
## Prerequisites
Before starting this tutorial, make sure you have:
* An active Prisme.ai account with access to **Knowledges** and **Agent Creator**
* A website URL with content you want to make conversational
* Basic understanding of HTML (to embed the chat widget on your site)
## Step 1: Create a Knowledge Base
Start by creating the Knowledge Base that will store your website content as embeddings.
From the Prisme.ai platform, open the **Knowledges** product.
From **Knowledge Bases** in the Knowledges sidebar, click **+ Create** (or use the Dashboard's **+ New Knowledge Base** tile — same dialog). Give it a clear name (for example, "Company Website") and pick the embedding model you want to use.
Save the Knowledge Base to open its detail view.
 ## Step 2: Add the website as a Web Source
The Knowledge Base ingests pages directly. Inside the Knowledge Base detail page, the **Add Web Source** action handles both single-page additions and full-site auto-discovery.
The global **Connectors** entry in the Knowledges sidebar is a separate, cross-Knowledge-Base concept. It is **not** how websites are added. Web ingestion lives on a Knowledge Base's own detail page, alongside file uploads.
From Knowledges → **Knowledge Bases**, click the Knowledge Base you just created. You land on its detail page where its files and web sources are listed.
Use the **Add Web Source** button next to **Add Documents**. (If the Knowledge Base is still empty, the same action is available from the dashed "Add a web source — Crawl a website or add a single URL" tile.)
The modal has two tabs:
* **Single URL** — adds one specific page (placeholder `https://example.com/page`). Use this when you only want to ingest a few hand-picked URLs.
* **Auto-Discovery** — crawls the whole website starting from a root URL. Use this for full-site ingestion.
For a website chatbot, pick **Auto-Discovery**.
Fill in the **Website URL** (e.g. `https://example.com`). The Auto-Discovery tab exposes per-hostname crawler settings:
* **Path filter** — restrict the crawl to a subtree (e.g. `/docs`).
* **Blacklisted patterns** — skip URLs matching given patterns (e.g. `/admin/.*`).
* **Respect robots.txt** — toggle (default on).
* **Sitemap only** + **Sitemap URL** — drive the crawl from a sitemap.
* **XPath filter** — only index nodes matching an XPath, e.g. `//article | //main`.
* **HTTP headers** — custom request headers (e.g. `Authorization`, `Cookie`) for sites that need auth.
If the hostname is already configured for another URL on the same Knowledge Base, the form pre-fills with the existing config and warns you that any change applies to all URLs on that hostname.
Click **Start Crawling**. The Knowledge Base PATCHes its `websites` list and `websites_config` map and the crawl runs in the background. Once submitted, the new entry appears under the **Web Sources** list on the Knowledge Base page with a per-source row summarizing its config and indexed page count.
Per-page-count limits and re-crawl interval are **Knowledge-Base-level**, not per-source. Open the Knowledge Base **Settings** tab to set:
* **Max pages** — overall crawl budget for the Knowledge Base.
* **Re-crawl interval** — manual or a fixed interval.
Crawling and embedding can take time depending on site size. You can begin testing as soon as some pages are processed. A maximum document quota is often enforced on your instance — contact your internal point of contact if you hit the limit.
You can re-crawl any web source on demand using the row's **Re-crawl** action, edit its hostname config via **Edit Config**, or remove it via **Remove**.
## Step 3: Inspect indexed content
Once crawling starts producing results, verify ingestion directly from the Knowledge Base.
From Knowledges → **Knowledge Bases**, click your Knowledge Base.
The Knowledge Base detail page lists each Web Source with its current **pages indexed** count. Underneath, the file list shows the actual indexed pages. Use the **Source type** filter (`all` / `file` / `web`) to focus on web content.
Click a row to inspect how a page was chunked. The Knowledge Base supports a built-in query test from the chat-with-KB surface — confirm relevant passages come back for representative questions.
## Step 4: Create the agent in Agent Creator
With the Knowledge Base ready, build the agent your visitors will chat with.
From the Prisme.ai platform, open **Agent Creator**.
Click **+ Create agent** and set:
* **Name** (for example, "Website Assistant")
* **Model** for generation
* **Instructions** — for example: *"Answer the user based on the indexed website content. Cite sources when possible. If the answer isn't in the indexed content, say so clearly."*
In the agent's configuration, attach the Knowledge Base you created in Step 1 as a knowledge source.
Save your changes.
## Step 2: Add the website as a Web Source
The Knowledge Base ingests pages directly. Inside the Knowledge Base detail page, the **Add Web Source** action handles both single-page additions and full-site auto-discovery.
The global **Connectors** entry in the Knowledges sidebar is a separate, cross-Knowledge-Base concept. It is **not** how websites are added. Web ingestion lives on a Knowledge Base's own detail page, alongside file uploads.
From Knowledges → **Knowledge Bases**, click the Knowledge Base you just created. You land on its detail page where its files and web sources are listed.
Use the **Add Web Source** button next to **Add Documents**. (If the Knowledge Base is still empty, the same action is available from the dashed "Add a web source — Crawl a website or add a single URL" tile.)
The modal has two tabs:
* **Single URL** — adds one specific page (placeholder `https://example.com/page`). Use this when you only want to ingest a few hand-picked URLs.
* **Auto-Discovery** — crawls the whole website starting from a root URL. Use this for full-site ingestion.
For a website chatbot, pick **Auto-Discovery**.
Fill in the **Website URL** (e.g. `https://example.com`). The Auto-Discovery tab exposes per-hostname crawler settings:
* **Path filter** — restrict the crawl to a subtree (e.g. `/docs`).
* **Blacklisted patterns** — skip URLs matching given patterns (e.g. `/admin/.*`).
* **Respect robots.txt** — toggle (default on).
* **Sitemap only** + **Sitemap URL** — drive the crawl from a sitemap.
* **XPath filter** — only index nodes matching an XPath, e.g. `//article | //main`.
* **HTTP headers** — custom request headers (e.g. `Authorization`, `Cookie`) for sites that need auth.
If the hostname is already configured for another URL on the same Knowledge Base, the form pre-fills with the existing config and warns you that any change applies to all URLs on that hostname.
Click **Start Crawling**. The Knowledge Base PATCHes its `websites` list and `websites_config` map and the crawl runs in the background. Once submitted, the new entry appears under the **Web Sources** list on the Knowledge Base page with a per-source row summarizing its config and indexed page count.
Per-page-count limits and re-crawl interval are **Knowledge-Base-level**, not per-source. Open the Knowledge Base **Settings** tab to set:
* **Max pages** — overall crawl budget for the Knowledge Base.
* **Re-crawl interval** — manual or a fixed interval.
Crawling and embedding can take time depending on site size. You can begin testing as soon as some pages are processed. A maximum document quota is often enforced on your instance — contact your internal point of contact if you hit the limit.
You can re-crawl any web source on demand using the row's **Re-crawl** action, edit its hostname config via **Edit Config**, or remove it via **Remove**.
## Step 3: Inspect indexed content
Once crawling starts producing results, verify ingestion directly from the Knowledge Base.
From Knowledges → **Knowledge Bases**, click your Knowledge Base.
The Knowledge Base detail page lists each Web Source with its current **pages indexed** count. Underneath, the file list shows the actual indexed pages. Use the **Source type** filter (`all` / `file` / `web`) to focus on web content.
Click a row to inspect how a page was chunked. The Knowledge Base supports a built-in query test from the chat-with-KB surface — confirm relevant passages come back for representative questions.
## Step 4: Create the agent in Agent Creator
With the Knowledge Base ready, build the agent your visitors will chat with.
From the Prisme.ai platform, open **Agent Creator**.
Click **+ Create agent** and set:
* **Name** (for example, "Website Assistant")
* **Model** for generation
* **Instructions** — for example: *"Answer the user based on the indexed website content. Cite sources when possible. If the answer isn't in the indexed content, say so clearly."*
In the agent's configuration, attach the Knowledge Base you created in Step 1 as a knowledge source.
Save your changes.
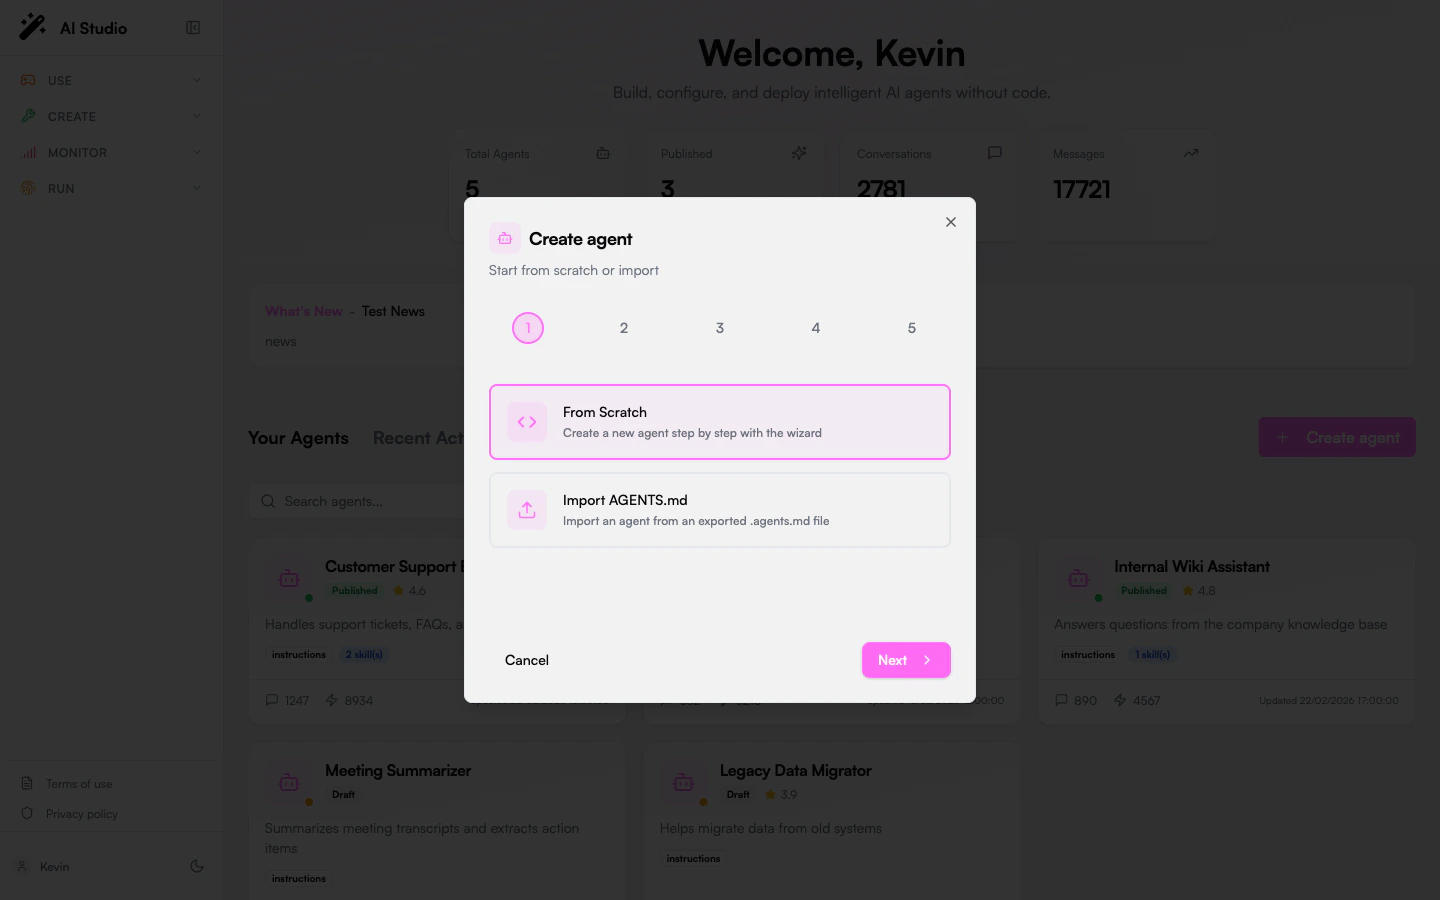 *The screenshot shows the agent creation wizard. Once the agent exists, attach the Knowledge Base from its capabilities/configuration view.*
## Step 5: Test the agent in the playground
From your agent in Agent Creator, open the **Playground** tab.
Try realistic questions about your website's content.
Review the cited sources / passages returned alongside each answer to confirm the agent is grounded in the right pages. Refine your instructions or Knowledge Base settings if needed.
## Step 6: Share the agent
Once the agent answers correctly in the Playground, expose it to your audience.
From your agent in Agent Creator, open the **Share** menu (in the agent header). The dialog gathers the surfaces available on your instance — for example, an access bindings panel for inviting users or groups, and (depending on instance configuration) a public link or embed snippet.
Copy the link, snippet, or invitation flow shown in the Share dialog. Available options vary by instance — some configurations expose a hosted chat URL and a `
*The screenshot shows the agent creation wizard. Once the agent exists, attach the Knowledge Base from its capabilities/configuration view.*
## Step 5: Test the agent in the playground
From your agent in Agent Creator, open the **Playground** tab.
Try realistic questions about your website's content.
Review the cited sources / passages returned alongside each answer to confirm the agent is grounded in the right pages. Refine your instructions or Knowledge Base settings if needed.
## Step 6: Share the agent
Once the agent answers correctly in the Playground, expose it to your audience.
From your agent in Agent Creator, open the **Share** menu (in the agent header). The dialog gathers the surfaces available on your instance — for example, an access bindings panel for inviting users or groups, and (depending on instance configuration) a public link or embed snippet.
Copy the link, snippet, or invitation flow shown in the Share dialog. Available options vary by instance — some configurations expose a hosted chat URL and a `