> ## Documentation Index
> Fetch the complete documentation index at: https://docs.prisme.ai/llms.txt
> Use this file to discover all available pages before exploring further.
# Building a Multi-Agent Orchestrator (A2A)
> Create specialist agents and an orchestrator that delegates to them, end-to-end, in Agent Creator
This tutorial walks you through a complete **Agent-to-Agent (A2A)** scenario in **Agent Creator**: you'll build two specialist agents, then a level-5 **Orchestrator** agent that delegates work to them. The example is a corporate procurement assistant for a fictional company, "Prisme" — employees ask about purchase policy, check stock, and submit orders, and the orchestrator routes each request to the right specialist.
## What You'll Build
Three agents that cooperate:
* **Policy Expert** — a knowledge-grounded specialist that answers procurement-policy and compliance questions from a Knowledge Base.
* **Purchase Assistant** — an agent that checks inventory and submits purchase orders through two custom functions, with **human approval** on sensitive actions.
* **Prisme Orchestrator** — a level-5 orchestrator that delegates to the two specialists (A2A) and combines their answers.
Along the way you'll use **Knowledge Bases** (RAG), **Custom Functions** (HTTP tools), **tool approval** (human-in-the-loop), and the **Playground** + **Evaluate** tabs to test everything.
This is the new Prisme.ai platform ("one-product"). All three agents live in **Agent Creator** — there is no Builder workspace to manage. The mock inventory and purchase endpoints used below are public sandbox webhooks, so you can follow along without building any backend.
## Prerequisites
Before starting, make sure you have:
* Access to a Prisme.ai workspace with **Agent Creator** and **Knowledges** enabled
* The knowledge-base document for the Policy Expert: **[Download the Purchase Policy (PDF)](/downloads/prisme-purchase-policy.pdf)**
* Basic familiarity with [agent profiles](/products/agent-factory/overview#agent-profiles)
Build the agents in the order below. The orchestrator references the two specialists by name, so they must exist (and be published) before you wire up delegation in Step 3.
## Step 1: Specialist #1 — Policy Expert
This agent answers procurement-policy questions, grounded in the purchase-policy document.
### 1a. Create the Knowledge Base
From AI Studio, open the **Knowledges** product. Go to **Knowledge Bases** and click **+ Create**.
Name the Knowledge Base **KB Prisme** and add a short description ("Prisme procurement policy and payment authorizations"). Pick an embedding model — the choice is permanent.
Open **KB Prisme**, go to its documents tab, click **Add Documents**, and upload the [Purchase Policy PDF](/downloads/prisme-purchase-policy.pdf) you downloaded. Wait for processing to finish (text extraction → chunking → embeddings).
 See [Knowledge Bases](/products/ai-knowledge/knowledge-bases) for the full reference.
### 1b. Create the agent
Switch to **Agent Creator** and click **+ Create agent**. Choose **From Scratch**.
* **Name**: `Policy Expert`
* **Description**: `Specialist in Prisme procurement policies, compliance rules, and approval workflows.`
Use the system prompt below.
In the agent's **Capabilities** tab, attach the **KB Prisme** Knowledge Base you created in 1a.
**System prompt — Policy Expert:**
```text theme={null}
You are a Policy Expert specializing in Prisme procurement compliance.
## Your Role
- Answer detailed questions about purchase limits, approval chains, and compliance rules
- Reference specific policy sections when answering
- Provide clear yes/no answers on whether a purchase is within policy
## Purchase Policy
### Approval Thresholds
Call the knowledge base "KB Prisme" anytime someone asks about the approval thresholds.
### Quantity Limits
- Auto-approval: 10 units or fewer (if within budget)
- Bulk orders (>10 units): manager approval required
- Enterprise licenses (>50 seats): IT review required
### Allowed Categories
Peripherals, Displays, Computers, Infrastructure, Software, Office Supplies, Furniture (facilities approval).
### Restricted Items
Personal devices, Travel bookings (Travel Portal), Consulting (Vendor Management), Items >$100K (CFO + board).
### Budget Codes
Format: DEPT-YYYY-NNN. Issued quarterly by Finance.
### Return Policy
- Cancel within 24h of submission
- Returns within 30 days of delivery
- Damaged items reported within 48h
### Compliance
- Quarterly audits on all purchases
- Duplicate orders within 30 days flagged
- Personal purchases strictly prohibited
If someone asks to send an email, use the tool send_email.
```
Why repeat the policy in both the prompt **and** the Knowledge Base? The prompt gives the agent quick rules of thumb; the Knowledge Base lets it quote exact thresholds and sections on demand. The line "Call the knowledge base KB Prisme…" tells the agent when to retrieve.
### 1c. Test it
Open the **Playground** and ask:
> Explain the Purchase Policy and the Payment Authorizations.
The agent should answer and cite chunks retrieved from **KB Prisme**.
## Step 2: Specialist #2 — Purchase Assistant
This agent does the operational work: check stock, then submit an order — with a budget code, and human approval on submissions.
### 2a. Create the agent
In **Agent Creator**, click **+ Create agent** → **From Scratch**.
* **Name**: `Purchase Assistant`
* **Description**: `Helps employees with purchase requests, inventory checks, and policy questions for Prisme.`
Use the system prompt below. It includes [dynamic variables](/products/agent-factory/instructions) (`${date}`, `${user_email}`, `${ip}`, …) that Agent Creator fills in at runtime.
In **Capabilities**, attach **KB Prisme** so the assistant can answer policy questions too.
**System prompt — Purchase Assistant:**
```text theme={null}
You are a Purchase Assistant for Prisme.
## Your Role
Help employees with purchase-related tasks:
- Check product availability and stock levels
- Submit purchase orders
- Answer questions about procurement policies
## Guidelines
1. Always check inventory before submitting a purchase
2. Always ask for a budget code before submitting (format: DEPT-YYYY-NNN)
3. Use the knowledge base to answer policy questions accurately
4. Any purchase over $100,000 must be stopped and requires CFO validation
5. Be concise and professional
## Workflow
1. Understand what the user needs
2. If they want to buy something: check inventory first, then submit the purchase
3. If they have a policy question: search the knowledge base
4. Always confirm order details before submitting
You are ${agent_name} (ID: ${agent_id}), an AI assistant for ${org}.
Today is ${date}. Current time: ${time}.
Day of the week: ${day}.
Full timestamp: ${datetime}.
You are speaking with user ${user_id} (${user_email}).
Request metadata:
- IP: ${ip}
- Correlation ID: ${correlation_id}
```
### 2b. Add the custom functions
Both tools are public sandbox webhooks — you can use them as-is. In **Capabilities**, click **Add Capability** → **Custom** tab → **Custom Function**, and fill the form for each.
| Field | Value |
| ----------------- | ----------------------------------------------------------------------------------------------------------- |
| **Function Name** | `check_inventory` |
| **Endpoint URL** | `https://api.sandbox.prisme.ai/v2/workspaces/qISUgj-/webhooks/mock-check-inventory` |
| **Description** | Check product availability and stock levels. Returns `in_stock`, `unit_price`, `category`, and `lead_time`. |
**Parameters Schema:**
```json theme={null}
{
"type": "object",
"required": ["product"],
"properties": {
"product": {
"type": "string",
"title": "product",
"description": "product"
}
}
}
```
| Field | Value |
| ----------------- | ------------------------------------------------------------------------------------------------------------------------------------ |
| **Function Name** | `submit_purchase` |
| **Endpoint URL** | `https://api.sandbox.prisme.ai/v2/workspaces/qISUgj-/webhooks/mock-submit-purchase` |
| **Description** | Submit a purchase order. Orders over 10 units require manager approval. Returns `order_status`, `order_id`, and `delivery_estimate`. |
**Parameters Schema:**
```json theme={null}
{
"type": "object",
"required": ["product", "quantity"],
"properties": {
"product": {
"type": "string",
"title": "product",
"description": "product"
},
"quantity": {
"type": "number",
"title": "quantity",
"description": "quantity"
},
"budget_code": {
"type": "string",
"title": "Code",
"description": "budget code"
}
}
}
```
See [Custom Tools](/products/agent-factory/custom-tools) for the full custom-function reference.
### 2c. Require approval before submitting an order
`submit_purchase` spends money — gate it behind a human. Open the agent's **Settings → Permissions** and set the **Default policy** to **Always ask** (or add a per-tool override on `submit_purchase`). Now every submission pauses on an approval card with **Approve** / **Reject** buttons.
See [Knowledge Bases](/products/ai-knowledge/knowledge-bases) for the full reference.
### 1b. Create the agent
Switch to **Agent Creator** and click **+ Create agent**. Choose **From Scratch**.
* **Name**: `Policy Expert`
* **Description**: `Specialist in Prisme procurement policies, compliance rules, and approval workflows.`
Use the system prompt below.
In the agent's **Capabilities** tab, attach the **KB Prisme** Knowledge Base you created in 1a.
**System prompt — Policy Expert:**
```text theme={null}
You are a Policy Expert specializing in Prisme procurement compliance.
## Your Role
- Answer detailed questions about purchase limits, approval chains, and compliance rules
- Reference specific policy sections when answering
- Provide clear yes/no answers on whether a purchase is within policy
## Purchase Policy
### Approval Thresholds
Call the knowledge base "KB Prisme" anytime someone asks about the approval thresholds.
### Quantity Limits
- Auto-approval: 10 units or fewer (if within budget)
- Bulk orders (>10 units): manager approval required
- Enterprise licenses (>50 seats): IT review required
### Allowed Categories
Peripherals, Displays, Computers, Infrastructure, Software, Office Supplies, Furniture (facilities approval).
### Restricted Items
Personal devices, Travel bookings (Travel Portal), Consulting (Vendor Management), Items >$100K (CFO + board).
### Budget Codes
Format: DEPT-YYYY-NNN. Issued quarterly by Finance.
### Return Policy
- Cancel within 24h of submission
- Returns within 30 days of delivery
- Damaged items reported within 48h
### Compliance
- Quarterly audits on all purchases
- Duplicate orders within 30 days flagged
- Personal purchases strictly prohibited
If someone asks to send an email, use the tool send_email.
```
Why repeat the policy in both the prompt **and** the Knowledge Base? The prompt gives the agent quick rules of thumb; the Knowledge Base lets it quote exact thresholds and sections on demand. The line "Call the knowledge base KB Prisme…" tells the agent when to retrieve.
### 1c. Test it
Open the **Playground** and ask:
> Explain the Purchase Policy and the Payment Authorizations.
The agent should answer and cite chunks retrieved from **KB Prisme**.
## Step 2: Specialist #2 — Purchase Assistant
This agent does the operational work: check stock, then submit an order — with a budget code, and human approval on submissions.
### 2a. Create the agent
In **Agent Creator**, click **+ Create agent** → **From Scratch**.
* **Name**: `Purchase Assistant`
* **Description**: `Helps employees with purchase requests, inventory checks, and policy questions for Prisme.`
Use the system prompt below. It includes [dynamic variables](/products/agent-factory/instructions) (`${date}`, `${user_email}`, `${ip}`, …) that Agent Creator fills in at runtime.
In **Capabilities**, attach **KB Prisme** so the assistant can answer policy questions too.
**System prompt — Purchase Assistant:**
```text theme={null}
You are a Purchase Assistant for Prisme.
## Your Role
Help employees with purchase-related tasks:
- Check product availability and stock levels
- Submit purchase orders
- Answer questions about procurement policies
## Guidelines
1. Always check inventory before submitting a purchase
2. Always ask for a budget code before submitting (format: DEPT-YYYY-NNN)
3. Use the knowledge base to answer policy questions accurately
4. Any purchase over $100,000 must be stopped and requires CFO validation
5. Be concise and professional
## Workflow
1. Understand what the user needs
2. If they want to buy something: check inventory first, then submit the purchase
3. If they have a policy question: search the knowledge base
4. Always confirm order details before submitting
You are ${agent_name} (ID: ${agent_id}), an AI assistant for ${org}.
Today is ${date}. Current time: ${time}.
Day of the week: ${day}.
Full timestamp: ${datetime}.
You are speaking with user ${user_id} (${user_email}).
Request metadata:
- IP: ${ip}
- Correlation ID: ${correlation_id}
```
### 2b. Add the custom functions
Both tools are public sandbox webhooks — you can use them as-is. In **Capabilities**, click **Add Capability** → **Custom** tab → **Custom Function**, and fill the form for each.
| Field | Value |
| ----------------- | ----------------------------------------------------------------------------------------------------------- |
| **Function Name** | `check_inventory` |
| **Endpoint URL** | `https://api.sandbox.prisme.ai/v2/workspaces/qISUgj-/webhooks/mock-check-inventory` |
| **Description** | Check product availability and stock levels. Returns `in_stock`, `unit_price`, `category`, and `lead_time`. |
**Parameters Schema:**
```json theme={null}
{
"type": "object",
"required": ["product"],
"properties": {
"product": {
"type": "string",
"title": "product",
"description": "product"
}
}
}
```
| Field | Value |
| ----------------- | ------------------------------------------------------------------------------------------------------------------------------------ |
| **Function Name** | `submit_purchase` |
| **Endpoint URL** | `https://api.sandbox.prisme.ai/v2/workspaces/qISUgj-/webhooks/mock-submit-purchase` |
| **Description** | Submit a purchase order. Orders over 10 units require manager approval. Returns `order_status`, `order_id`, and `delivery_estimate`. |
**Parameters Schema:**
```json theme={null}
{
"type": "object",
"required": ["product", "quantity"],
"properties": {
"product": {
"type": "string",
"title": "product",
"description": "product"
},
"quantity": {
"type": "number",
"title": "quantity",
"description": "quantity"
},
"budget_code": {
"type": "string",
"title": "Code",
"description": "budget code"
}
}
}
```
See [Custom Tools](/products/agent-factory/custom-tools) for the full custom-function reference.
### 2c. Require approval before submitting an order
`submit_purchase` spends money — gate it behind a human. Open the agent's **Settings → Permissions** and set the **Default policy** to **Always ask** (or add a per-tool override on `submit_purchase`). Now every submission pauses on an approval card with **Approve** / **Reject** buttons.
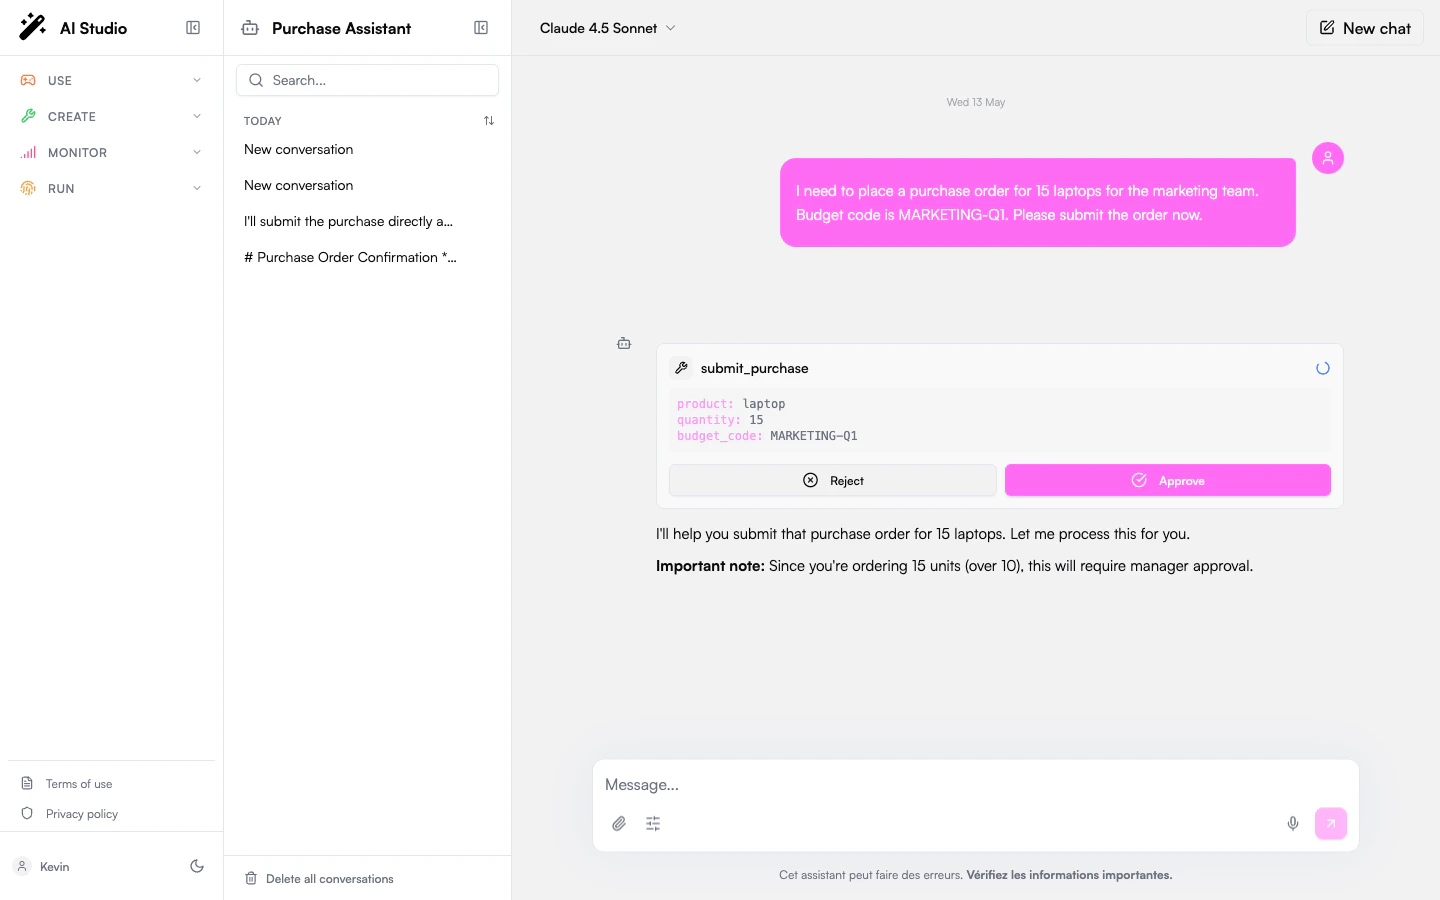 See [Tool Permissions](/products/agent-factory/tool-permissions) for per-tool overrides, conditions, and designated approvers.
### 2d. Test it
In the **Playground**, run these in order and watch the tool calls:
> Is the webcam in stock? How much does it cost?
> Submit a purchase order for 15 monitors. Budget code: IT-2026-003
> I need to buy a \$120,000 training for my team. It is a training for a new software. Budget code: IT-2026-123
You should see: an inventory lookup; an order that triggers the approval card (15 units > 10); and the \$120K request stopped per the CFO rule. Try the **Embedded Chat** preview to see how the agent looks once exposed to end users.
## Step 3: The Orchestrator (Agent-to-Agent)
Now the centerpiece: a level-5 **Orchestrator** that delegates to the two specialists instead of doing the work itself.
### 3a. Create the orchestrator agent
Click **+ Create agent**. When choosing the profile, pick **Orchestrator** (level 5). This unlocks the `agent_delegate` and `agent_list_available` system tools and raises the budget (50 turns, 200K tokens, delegation depth 3).
* **Name**: `Prisme Orchestrator`
* **Description**: `Central assistant that coordinates between specialist agents for purchase requests and policy questions.`
* **Model**: `Claude Sonnet 4.5`
Use the system prompt below.
**System prompt — Prisme Orchestrator:**
```text theme={null}
You are the Prisme Orchestrator. You coordinate between specialist agents to help employees.
## Available Specialists
- **Purchase Assistant**: Handles purchase requests, inventory checks, and order submissions
- **Policy Expert**: Answers detailed questions about procurement policies, compliance rules, and approval workflows
## Delegation Rules
1. For purchase requests and inventory questions -> delegate to Purchase Assistant
2. For policy questions and compliance checks -> delegate to Policy Expert
3. For complex requests (e.g., "Can I buy 50 monitors under policy?") -> delegate to Policy Expert first for the policy check, then to Purchase Assistant for the order
4. Always summarize the specialist's response clearly for the user
5. If unsure which specialist to use, ask the user for clarification
## Guidelines
- Be helpful and concise
- When delegating, explain briefly what you're doing
- Combine responses from multiple specialists into a coherent answer
- Never make up information — always delegate to the appropriate specialist
```
### 3b. Add the specialists as sub-agents
This is the A2A wiring. In the orchestrator's **Capabilities** tab:
Click **Add Capability**, select type **Sub-Agent**, and pick **Policy Expert** from the published agents. Optionally override the display name (e.g. `Policy_Expert`).
Repeat: **Add Capability** → **Sub-Agent** → **Purchase Assistant** (e.g. `Purchase_Assistant`).
Each specialist must be **published** to appear in the sub-agent picker. A sub-agent keeps its **own** configuration — its Knowledge Base, custom functions, and approval policy still apply when the orchestrator calls it. Delegation is exposed to the orchestrator via the `agent_delegate` tool; see [Capabilities → System Tools](/products/agent-factory/capabilities).
### 3c. (Optional) Add an email function
The demo also lets the orchestrator send a recap email via a `send_email` custom function.
| Field | Value |
| ----------------- | ------------------------ |
| **Function Name** | `send_email` |
| **Endpoint URL** | *your own email webhook* |
| **Description** | Send an email. |
**Parameters Schema:**
```json theme={null}
{
"type": "object",
"properties": {
"to": { "type": "string" },
"subject": { "type": "string" },
"body": { "type": "string" }
}
}
```
The `send_email` endpoint in the original demo points to a private workspace and is **not** publicly reachable. Replace it with your own email-sending endpoint — for example a [Builder automation](/products/ai-builder/automations) that wraps your mail provider — or skip this step. It's optional for the A2A flow.
### 3d. Test delegation
In the orchestrator's **Playground**, try a simple delegation, then a composed one:
> What's the maximum amount a Director can approve without VP sign-off?
> Is the webcam in stock? How much does it cost?
> Submit a purchase order for 15 monitors. Budget code: IT-2026-003
Watch the trace: the orchestrator calls `agent_delegate`, routes the first question to **Policy Expert** and the others to **Purchase Assistant**, then summarizes. The 15-monitor order still triggers Purchase Assistant's approval card — the sub-agent's policy is enforced.
## Step 4: Trace, test & evaluate
Once the flow works, lock it in with a golden test set.
In the Playground, expand each step to see the delegation chain (which sub-agent was called, with what input, and what it returned). This is how you debug routing.
On the **Prisme Orchestrator**, open the **Evaluate** tab and add a test case. For example:
> **Question:** I need to order 5 keyboards for my engineering team. Budget code: ENG-2026-042
>
> **Expected answer:** the order is auto-approved (5 units \< 10, well under the \$5,000 limit) with an order ID and a 3–5 business-day delivery estimate.
Where supported, mark **Delegated** as an **expected tool** (the orchestrator must delegate, not answer from memory) and **send\_email** as a **forbidden tool** for this case. Re-run the suite after any change to instructions, sub-agents, or models.
See [Runtime Safeguards](/products/agent-factory/runtime-safeguards) for budget caps — orchestrators that delegate need higher turn/tool-call limits than a plain chat agent.
## Going further
The full demo extends this A2A core with five more layers. Each maps to existing product docs:
* **SSO** (OIDC/SAML) with your directory, mapped to **RBAC** roles in **Governance**.
* **On-Behalf-Of**: an agent calls a connector (e.g. SharePoint) under the **user's** identity, so retrieval respects their permissions.
* **Guardrails** on the orchestrator: **PII detection** (email, phone, credit card, IP), **prompt-injection detection** (set to *High*), and a **topic guard** (allow: purchasing, procurement, inventory, policies, budget, orders, products — block: politics, sports, coding, weather, personal advice). Test it with classic jailbreak prompts ("ignore all previous instructions…") and confirm the guardrail blocks **before** execution.
See [Governance → Capabilities](/products/ai-governance/capabilities#guardrails).
In **Governance**: the capabilities catalog, subscriptions, and **Agent Control** (default model, quotas, hard/soft blocks, routing strategy). Track spend with **FinOps dashboards & budget caps**, add models with per-model **max tokens**, and review per-agent **Statistics** in Agent Creator. Agents and workflows can be **exported** in readable formats.
Publish the orchestrator to the **catalog** with **Restricted** access, and manage who can discover and subscribe to it. See [Discovering Agents](/products/agent-factory/discovering-agents).
In **Insights → Agent Graph**, delegation relationships appear as **emerald "Delegates" edges** between the orchestrator and its specialists — a live map of your A2A topology. See [Insights → Graph](/products/ai-insights/graph).
## Wrapping up
You built a working **A2A** system: two specialist agents (one RAG-grounded, one tool-driven with human approval) and a level-5 **Orchestrator** that delegates to them and combines their answers — all in Agent Creator, with no backend to maintain. The same pattern scales to any domain: build focused specialists, then compose them under an orchestrator with clear delegation rules.
## Next Steps
Go deeper on Knowledge Bases and retrieval for your specialist agents.
See every capability type — tools, knowledge, guardrails, sub-agents.
Configure human-in-the-loop approval for sensitive actions.
Visualize delegation and tool usage across all your agents.
See [Tool Permissions](/products/agent-factory/tool-permissions) for per-tool overrides, conditions, and designated approvers.
### 2d. Test it
In the **Playground**, run these in order and watch the tool calls:
> Is the webcam in stock? How much does it cost?
> Submit a purchase order for 15 monitors. Budget code: IT-2026-003
> I need to buy a \$120,000 training for my team. It is a training for a new software. Budget code: IT-2026-123
You should see: an inventory lookup; an order that triggers the approval card (15 units > 10); and the \$120K request stopped per the CFO rule. Try the **Embedded Chat** preview to see how the agent looks once exposed to end users.
## Step 3: The Orchestrator (Agent-to-Agent)
Now the centerpiece: a level-5 **Orchestrator** that delegates to the two specialists instead of doing the work itself.
### 3a. Create the orchestrator agent
Click **+ Create agent**. When choosing the profile, pick **Orchestrator** (level 5). This unlocks the `agent_delegate` and `agent_list_available` system tools and raises the budget (50 turns, 200K tokens, delegation depth 3).
* **Name**: `Prisme Orchestrator`
* **Description**: `Central assistant that coordinates between specialist agents for purchase requests and policy questions.`
* **Model**: `Claude Sonnet 4.5`
Use the system prompt below.
**System prompt — Prisme Orchestrator:**
```text theme={null}
You are the Prisme Orchestrator. You coordinate between specialist agents to help employees.
## Available Specialists
- **Purchase Assistant**: Handles purchase requests, inventory checks, and order submissions
- **Policy Expert**: Answers detailed questions about procurement policies, compliance rules, and approval workflows
## Delegation Rules
1. For purchase requests and inventory questions -> delegate to Purchase Assistant
2. For policy questions and compliance checks -> delegate to Policy Expert
3. For complex requests (e.g., "Can I buy 50 monitors under policy?") -> delegate to Policy Expert first for the policy check, then to Purchase Assistant for the order
4. Always summarize the specialist's response clearly for the user
5. If unsure which specialist to use, ask the user for clarification
## Guidelines
- Be helpful and concise
- When delegating, explain briefly what you're doing
- Combine responses from multiple specialists into a coherent answer
- Never make up information — always delegate to the appropriate specialist
```
### 3b. Add the specialists as sub-agents
This is the A2A wiring. In the orchestrator's **Capabilities** tab:
Click **Add Capability**, select type **Sub-Agent**, and pick **Policy Expert** from the published agents. Optionally override the display name (e.g. `Policy_Expert`).
Repeat: **Add Capability** → **Sub-Agent** → **Purchase Assistant** (e.g. `Purchase_Assistant`).
Each specialist must be **published** to appear in the sub-agent picker. A sub-agent keeps its **own** configuration — its Knowledge Base, custom functions, and approval policy still apply when the orchestrator calls it. Delegation is exposed to the orchestrator via the `agent_delegate` tool; see [Capabilities → System Tools](/products/agent-factory/capabilities).
### 3c. (Optional) Add an email function
The demo also lets the orchestrator send a recap email via a `send_email` custom function.
| Field | Value |
| ----------------- | ------------------------ |
| **Function Name** | `send_email` |
| **Endpoint URL** | *your own email webhook* |
| **Description** | Send an email. |
**Parameters Schema:**
```json theme={null}
{
"type": "object",
"properties": {
"to": { "type": "string" },
"subject": { "type": "string" },
"body": { "type": "string" }
}
}
```
The `send_email` endpoint in the original demo points to a private workspace and is **not** publicly reachable. Replace it with your own email-sending endpoint — for example a [Builder automation](/products/ai-builder/automations) that wraps your mail provider — or skip this step. It's optional for the A2A flow.
### 3d. Test delegation
In the orchestrator's **Playground**, try a simple delegation, then a composed one:
> What's the maximum amount a Director can approve without VP sign-off?
> Is the webcam in stock? How much does it cost?
> Submit a purchase order for 15 monitors. Budget code: IT-2026-003
Watch the trace: the orchestrator calls `agent_delegate`, routes the first question to **Policy Expert** and the others to **Purchase Assistant**, then summarizes. The 15-monitor order still triggers Purchase Assistant's approval card — the sub-agent's policy is enforced.
## Step 4: Trace, test & evaluate
Once the flow works, lock it in with a golden test set.
In the Playground, expand each step to see the delegation chain (which sub-agent was called, with what input, and what it returned). This is how you debug routing.
On the **Prisme Orchestrator**, open the **Evaluate** tab and add a test case. For example:
> **Question:** I need to order 5 keyboards for my engineering team. Budget code: ENG-2026-042
>
> **Expected answer:** the order is auto-approved (5 units \< 10, well under the \$5,000 limit) with an order ID and a 3–5 business-day delivery estimate.
Where supported, mark **Delegated** as an **expected tool** (the orchestrator must delegate, not answer from memory) and **send\_email** as a **forbidden tool** for this case. Re-run the suite after any change to instructions, sub-agents, or models.
See [Runtime Safeguards](/products/agent-factory/runtime-safeguards) for budget caps — orchestrators that delegate need higher turn/tool-call limits than a plain chat agent.
## Going further
The full demo extends this A2A core with five more layers. Each maps to existing product docs:
* **SSO** (OIDC/SAML) with your directory, mapped to **RBAC** roles in **Governance**.
* **On-Behalf-Of**: an agent calls a connector (e.g. SharePoint) under the **user's** identity, so retrieval respects their permissions.
* **Guardrails** on the orchestrator: **PII detection** (email, phone, credit card, IP), **prompt-injection detection** (set to *High*), and a **topic guard** (allow: purchasing, procurement, inventory, policies, budget, orders, products — block: politics, sports, coding, weather, personal advice). Test it with classic jailbreak prompts ("ignore all previous instructions…") and confirm the guardrail blocks **before** execution.
See [Governance → Capabilities](/products/ai-governance/capabilities#guardrails).
In **Governance**: the capabilities catalog, subscriptions, and **Agent Control** (default model, quotas, hard/soft blocks, routing strategy). Track spend with **FinOps dashboards & budget caps**, add models with per-model **max tokens**, and review per-agent **Statistics** in Agent Creator. Agents and workflows can be **exported** in readable formats.
Publish the orchestrator to the **catalog** with **Restricted** access, and manage who can discover and subscribe to it. See [Discovering Agents](/products/agent-factory/discovering-agents).
In **Insights → Agent Graph**, delegation relationships appear as **emerald "Delegates" edges** between the orchestrator and its specialists — a live map of your A2A topology. See [Insights → Graph](/products/ai-insights/graph).
## Wrapping up
You built a working **A2A** system: two specialist agents (one RAG-grounded, one tool-driven with human approval) and a level-5 **Orchestrator** that delegates to them and combines their answers — all in Agent Creator, with no backend to maintain. The same pattern scales to any domain: build focused specialists, then compose them under an orchestrator with clear delegation rules.
## Next Steps
Go deeper on Knowledge Bases and retrieval for your specialist agents.
See every capability type — tools, knowledge, guardrails, sub-agents.
Configure human-in-the-loop approval for sensitive actions.
Visualize delegation and tool usage across all your agents.