> ## Documentation Index
> Fetch the complete documentation index at: https://docs.prisme.ai/llms.txt
> Use this file to discover all available pages before exploring further.
# Working with Data
> Browse, sort, and manage the records in a collection
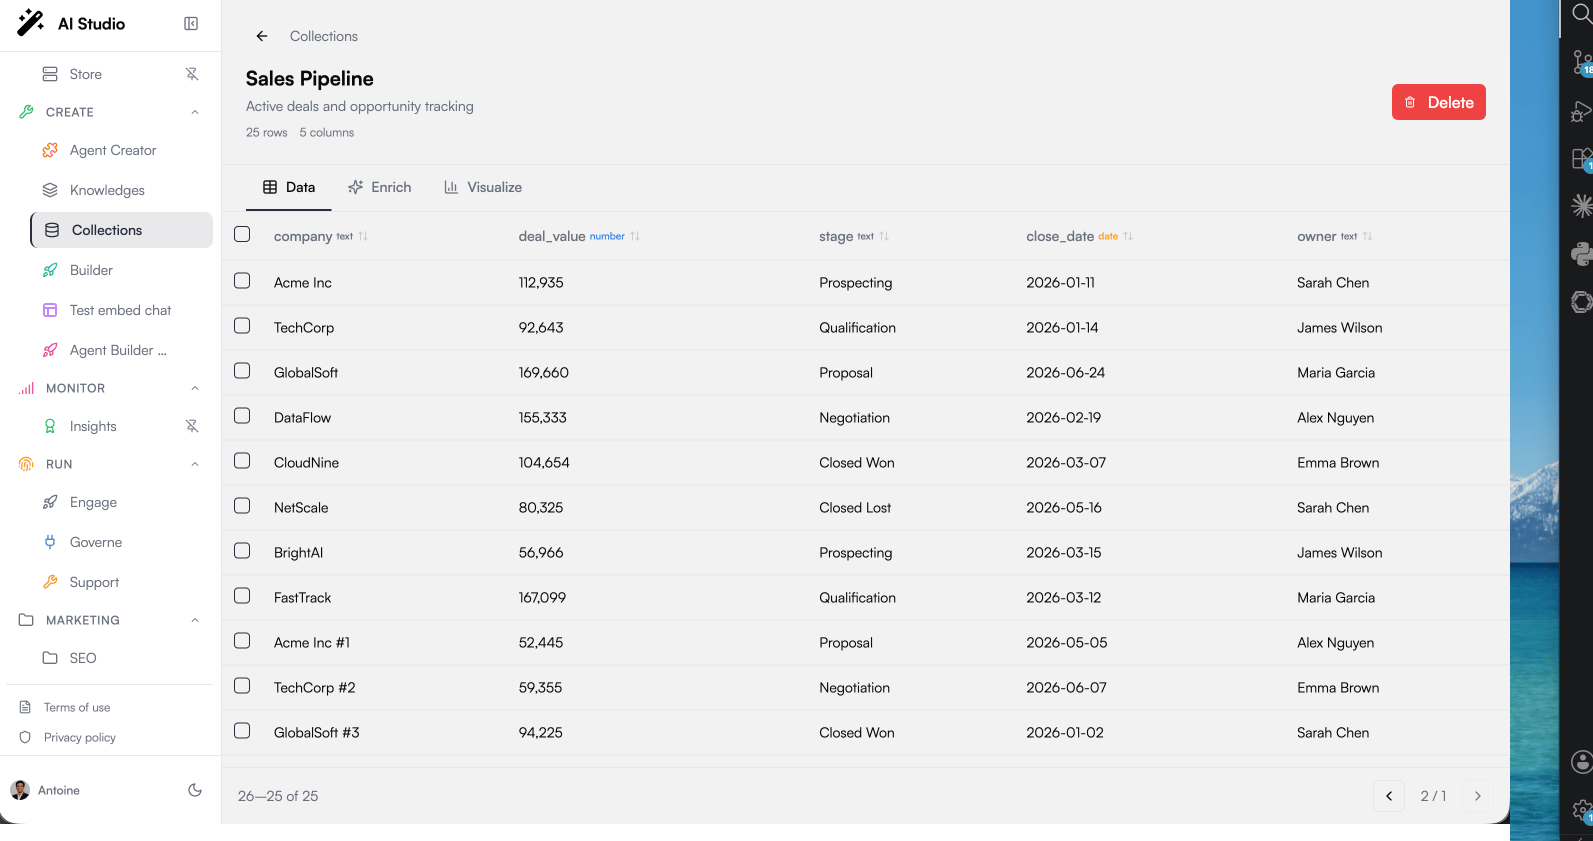 The **Data** tab of a collection is a spreadsheet-like table for exploring and managing records. It is designed for large datasets: rows are paginated and loaded on demand, so collections with thousands of records stay fast.
## Reading the Table
Each column header shows the **column name** and a **type badge** (`text`, `number`, `date`, `boolean`, `url`). Values are formatted according to their type:
| Type | Displayed as |
| ----------- | ----------------------------------- |
| `text` | Plain text |
| `number` | Localized formatting (e.g. `1,247`) |
| `date` | Formatted date |
| `boolean` | Yes / No |
| `url` | Clickable link |
| Empty value | Shown as a dash |
Structured values (nested objects) are displayed as JSON.
## Sorting
Click a column header to sort ascending; click again to sort descending. The active sort is shown with an arrow (↑ or ↓) in the header. Sorting applies to the **whole collection**, not just the visible page.
## Navigating Pages
Pagination controls at the bottom of the table let you:
* Move between pages with the **◀ ▶** arrows or by clicking a page number
* Change the page size with the **rows per page** dropdown (10 to 50 rows, default 25)
* See your position with the **"Showing X–Y of Z"** counter
## Selecting and Deleting Records
Use the checkbox on each row, or the header checkbox to select the whole page. A badge shows how many rows are selected.
Click **Delete** in the selection bar. The selected records are removed and the table refreshes.
Deleting records is immediate and permanent. If agents rely on this collection, make sure the records are no longer needed.
## Data Written by Agents
Collections linked to agents evolve outside the UI: agents insert and update records during conversations. Two things to keep in mind:
* **New columns can appear.** Schemas are flexible: if an agent starts recording a new field, it shows up as a new column.
* **System fields are protected.** Record identifiers, creation timestamps, and ownership metadata are managed by the platform and cannot be modified, even by agents.
To audit what agents are doing with your data, every insert, update, and deletion is recorded as an audit event. See [Using Collections with Agents](/products/ai-collection/agents).
## Best Practices
Sorting by a suspect column is the quickest way to find outliers: empty values group together, and malformed entries stand out at the top or bottom of the ordering.
Reviewing data quality? Use 50 rows per page to scan quickly. Comparing individual records? Drop to 10 for readability.
Select and delete rows page by page rather than removing large swaths at once; it is easier to verify what you removed.
## Next Steps
Turn your records into charts
Query and update records programmatically
The **Data** tab of a collection is a spreadsheet-like table for exploring and managing records. It is designed for large datasets: rows are paginated and loaded on demand, so collections with thousands of records stay fast.
## Reading the Table
Each column header shows the **column name** and a **type badge** (`text`, `number`, `date`, `boolean`, `url`). Values are formatted according to their type:
| Type | Displayed as |
| ----------- | ----------------------------------- |
| `text` | Plain text |
| `number` | Localized formatting (e.g. `1,247`) |
| `date` | Formatted date |
| `boolean` | Yes / No |
| `url` | Clickable link |
| Empty value | Shown as a dash |
Structured values (nested objects) are displayed as JSON.
## Sorting
Click a column header to sort ascending; click again to sort descending. The active sort is shown with an arrow (↑ or ↓) in the header. Sorting applies to the **whole collection**, not just the visible page.
## Navigating Pages
Pagination controls at the bottom of the table let you:
* Move between pages with the **◀ ▶** arrows or by clicking a page number
* Change the page size with the **rows per page** dropdown (10 to 50 rows, default 25)
* See your position with the **"Showing X–Y of Z"** counter
## Selecting and Deleting Records
Use the checkbox on each row, or the header checkbox to select the whole page. A badge shows how many rows are selected.
Click **Delete** in the selection bar. The selected records are removed and the table refreshes.
Deleting records is immediate and permanent. If agents rely on this collection, make sure the records are no longer needed.
## Data Written by Agents
Collections linked to agents evolve outside the UI: agents insert and update records during conversations. Two things to keep in mind:
* **New columns can appear.** Schemas are flexible: if an agent starts recording a new field, it shows up as a new column.
* **System fields are protected.** Record identifiers, creation timestamps, and ownership metadata are managed by the platform and cannot be modified, even by agents.
To audit what agents are doing with your data, every insert, update, and deletion is recorded as an audit event. See [Using Collections with Agents](/products/ai-collection/agents).
## Best Practices
Sorting by a suspect column is the quickest way to find outliers: empty values group together, and malformed entries stand out at the top or bottom of the ordering.
Reviewing data quality? Use 50 rows per page to scan quickly. Comparing individual records? Drop to 10 for readability.
Select and delete rows page by page rather than removing large swaths at once; it is easier to verify what you removed.
## Next Steps
Turn your records into charts
Query and update records programmatically